[DEPRECATED] Updated Version here.
1.1 What you need
1 x XV-11 Lidar with Controller or any supported 2D lidar.
1 x Ubuntu Installed laptop/desktop (Development Computer)
1 x Radxa Rock Pro (Robot’s computer) or any supported dev boards
1 x Teensy 3.1 Board or latest.
1 x GY-85 IMU
2 x L298 Beakout Board or any motor driver that has PWM (EN) and input pins (IN1 and IN2)
1 x Breadboard or Prototyping Board
1 x 12V Battery (Preferably 3S Li-Po Battery)
1 x Caster Wheels (only for 2WD)
2 x Robot Wheels (only for 2WD)
4 x Robot Wheels (only for 4wD)
4 x Mecanum Wheels (only for Mecanum Drive)
1 x Servo (only for Ackermann Steering)
1 x Wood or Acrylic sheet for the robot’s base
1.2 Setting-up
1.2.1 Dev Tools
Download the setup packages on your development computer and the robot’s computer:
cd
git clone https://github.com/linorobot/lino_setup.git
Install the dev-tools on the robot’s computer:
cd lino_setup
sudo ./dev_tools_install.sh
1.2.2 uDev Rules
The serial ports for XV-11 lidar and Teensy board are defined using its static names on the roslaunch files. In order for the serial ports to be remembered and linked to its static names, a udev rule must be created.
Run lino’s uDev tool on the robot’s computer.
cd lino_setup
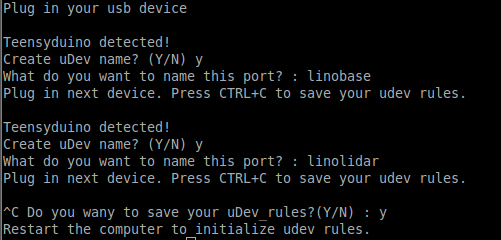
sudo python lino_udev.py
Plug in the Teensy board and key in “linobase”. Do the same thing for the XV-11 lidar and name it as “linolidar”. Save your uDev rules by pressing CTRL+C. Make sure to reboot the robot’s computer to reinitialize the rules.
After rebooting, run the following commands to confirm your uDev rules worked.
ls /dev/linobase
ls /dev/linolidar
1.2.3 Network Setup
Configure your ROS network so your development computer know where the ROS Master(robot’s computer) is in your local network.
First, know the hostnames of your development computer and the robot’s computer. Run hostname on both computers:
hostname
Run lino_network.sh on the development computer:
cd lino_setup
sudo ./lino_network.sh robothostname developmenthostname
source ~/.bashrc
and the robot’s computer:
cd lino_setup
sudo ./lino_network.sh robothostname robothostname
source ~/.bashrc
1.3 Installing ROS Indigo
You need to install ROS Indigo on two Linux computers(Ubuntu 14.04). One computer to power the robot and another one for development.
Alternatively you can run the install scripts.
On your development computer, run:
git clone https://github.com/grassjelly/linux_install.git
cd linux_install
sudo ./install_ros_desktop.sh
On the robot’s computer:
git clone https://github.com/grassjelly/linux_install.git
cd linux_install
sudo ./install_ros_arm.sh
After ROS installation, create and configure your ROS environment.
ROS needs to know which catkin workspace you want to use to find the right packages and dependencies. It would be convenient to automate this every time you open a new terminal.
echo "source ~/catkin_ws/devel/setup.bash" >> ~/.bashrc
source ~/.bashrc
1.4 Installing ROS Packages
On your robot’s computer, run ros_packages_install.sh to download all the ROS packages needed. Go to lino_setup folder and run:
cd ~/lino_setup
sudo ./ros_packages_install.sh
Build the packages using catkin_make:
cd ~/catkin_ws
catkin_make
Next, clone the Linorobot platform you want to build. Replace linorobot* with the right Linorobot package:
cd ~/catkin_ws/src
git clone https://github.com/grassjelly/linorobot*.git
linorobot https://github.com/grassjelly/linorobot (2WD Platform)
linorobot_4wd https://github.com/grassjelly/linorobot_4wd (4WD Platform)
linorobot_ackermann https://github.com/grassjelly/linorobot_ackermann (Ackermann Steering Platform)
linorobot_mecanum https://github.com/grassjelly/linorobot_mecanum (Mecanum Drive Platform)
For example you want to build an Ackermann steering robot:
cd ~/catkin_ws/src
git clone https://github.com/grassjelly/linorobot_ackermann.git
Download the remaining ROS packages on your development computer:
cd ~/catkin_ws/src
git clone https://github.com/linorobot/lino_pid.git
git clone https://github.com/linorobot/lino_msgs.git
git clone https://github.com/linorobor/lino_visualize
cd .. && catkin_make
1.5 Launching and editing files
Linorobot supports different ROS based platforms (2WD, 4WD, Ackermann Steering, and Mecanum Drive). The examples in this tutorial is based on the 2WD platform (https://github.com/grassjelly/linorobot) package so you need to change the launch files or directory accordingly based on the platform you are working on.
For example if you are launching bringup.launch for linorobot_ackermann,
The tutorial will ask you to run:
roslaunch linorobot bringup.launch
Since you’re working on linorobot_ackermann, you need to run this instead:
roslaunch linorobot_ackermann bringup.launch
The same for editing files or changing directories. Instead of following the default instruction:
nano linorobot/arduino/firmware/lib/config/lino_base_config.h
Change to this:
nano linorobot_ackermann/arduino/firmware/lib/config/lino_base_config.h
1.6 ROS Tutorials
It is recommended to read through the ROS Tutorials to get you familiarize with ROS’s jargons, standards, and methodologies used in this tutorial.
2. Base Controller
Now you’re ready to build the hardware. Please proceed to base-controller page.
